 Save to Pinterest
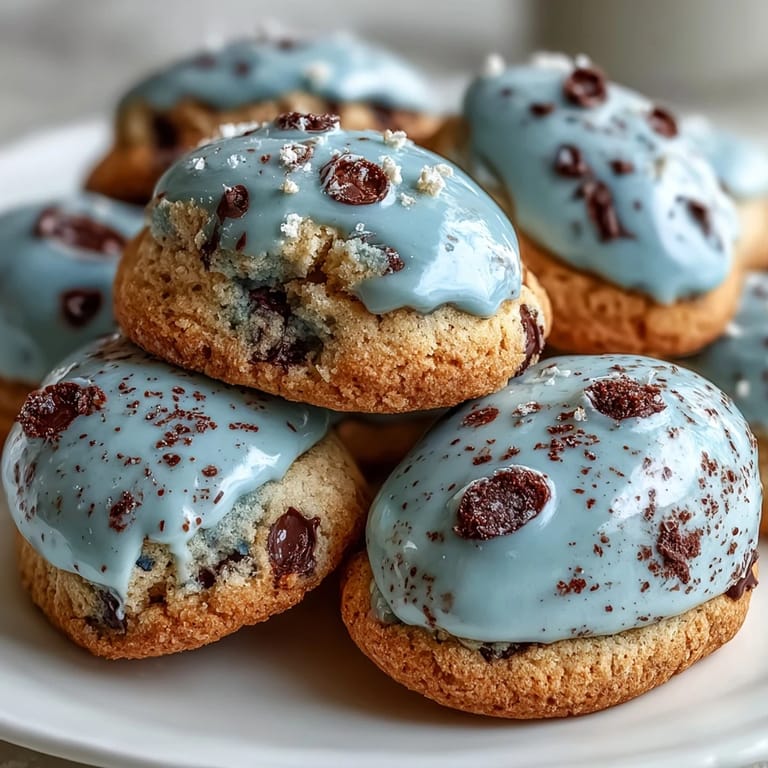
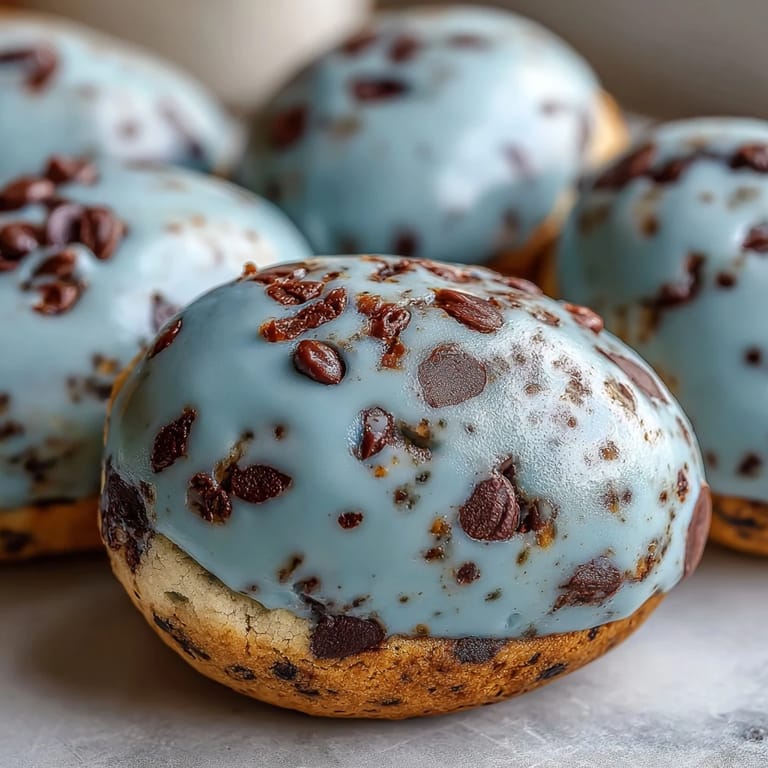
 The soft clatter of the oven preheating signaled the start of what accidentally became the prettiest batch of spring cookies I've ever made. I can still picture the blue smudges on my fingers as I tinted the dough—trying to strike that elusive 'robin's egg' hue before the butter softened too much. There is a particular joy in making something that looks whimsical, even if you're mostly just after something sweet. My kitchen became a temporary art studio, cocoa speckles landing everywhere but the cookies when I first tried flicking them. The result was worth every bit of the mess.
The first time I made these for a neighborhood picnic, our youngest guest loudly declared, 'I found a blue egg!' and then giggled at his chocolate-speckled mouth. I loved watching new friends hover between taking a bite and admiring their cookie, nudging each other to guess the flavor. Sharing these transformed a gray day into a sweet spring celebration made of sticky fingers and laughter.
Ingredients
- All-purpose flour: The backbone of the cookies, sift well for the best tender crumb—I always go for unbleached for subtle flavor.
- Baking powder: Adds a delicate lift; I once skipped it and ended up with dense little pebbles (never again).
- Fine salt: Balances the sweetness, so don't skimp; a pinch goes a long way here.
- Unsalted butter: Softened just enough to leave a fingerprint—cold butter won’t cream right, and melted will ruin the dough.
- Granulated sugar: For crisp edges and classic sweetness; I like to use superfine if I have it for that barely-there texture.
- Egg: Binds everything—let it come to room temperature so the dough blends smooth.
- Pure vanilla extract: Essential for warmth; I sometimes up the vanilla just a touch when baking for family.
- Almond extract (optional): Adds a floral hint—totally optional, but a scant splash is enough.
- Blue gel food coloring: A few careful drops for that iconic robins-egg tint; always use gel, because liquid thins dough and icing too much.
- Powdered sugar: Sifted for lump-free icing; don’t skip this step, or you’ll be chasing clumps for ages.
- Milk: Just enough to create spreadable icing, added slowly so you don’t end up with runoff.
- Light corn syrup: Gives icing its glossy, just-set sheen that makes cookies look store-bought.
- Unsweetened cocoa powder: The magic speckle maker—skip Dutch-process, it’s too dark for the effect.
- Vanilla extract (for speckling): Adds a hint of aroma to the cocoa paint; I noticed it masks any raw cocoa tang.
Tired of Takeout? 🥡
Get 10 meals you can make faster than delivery arrives. Seriously.
One email. No spam. Unsubscribe anytime.
Instructions
- Start the dry mix:
- Whisk together the flour, baking powder, and salt until everything looks soft and pale, with no streaks left.
- Cream the butter and sugar:
- Beat butter and sugar in a large bowl until the mixture is lighter in color—don't rush this step, it's how you get those crisp edges.
- Add the egg and extracts:
- Mix in the egg, vanilla, and almond extract; scrape down the bowl to catch any stubborn bits at the bottom.
- Combine dry and wet:
- Gradually add the dry ingredients; the dough will go from shaggy to smooth, and it should just hold together.
- Tint the dough:
- Add blue gel coloring drop by drop, kneading gently with a spatula or your fingers until you achieve that bluebird cloud color.
- Chill the dough:
- Divide dough in half and press each piece into a disc; wrap both, then chill for at least 30 minutes until firm to the touch.
- Shape and bake:
- Roll out cold dough to 1/4 inch thick and cut into ovals—arrange on parchment, then bake until the edges look just set with no golden color.
- Cool and prep icing:
- Let cookies stand 5 minutes, then cool completely on a rack; meanwhile, whisk icing ingredients until glossy and thick enough to coat a spoon.
- Decorate:
- Tint icing light blue, then either spread or pipe onto cookies—let them air dry for 15 minutes before speckling.
- Make the speckles:
- Mix cocoa, water, and vanilla until smooth, then let your inner artist loose, flicking speckles over each cookie with a stiff brush or clean toothbrush.
- Dry and enjoy:
- Let cookies finish drying completely before stacking or storing—or sneak one right away if you can’t wait.
 Save to Pinterest
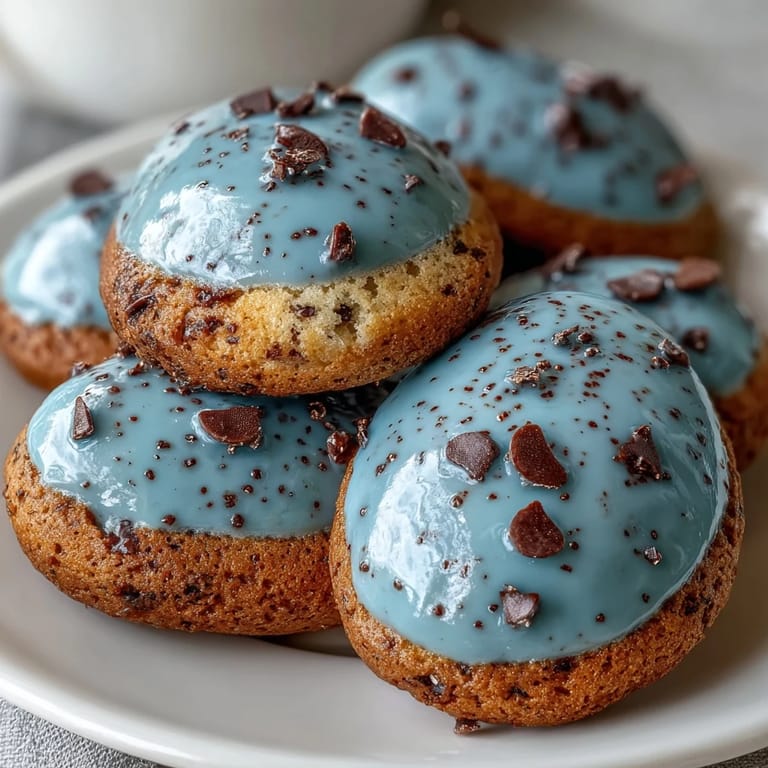
 When I brought a tin of these to my old book club, everyone paused to admire them before taking a bite—it was one of the rare times dessert started a bigger conversation than the novel we’d just finished.
Making Your Cookies Truly Look Like Robins Eggs
The trickiest part for me was getting that pale blue right—too much food coloring and they screamed Smurf, too little and they looked gray. I always add the color a drop at a time, kneading gently, and check the shade near natural light if it’s a cloudy day.
Getting the Speckles Just Right
Flicking the bristles takes a little practice; it helps to set your cookies on a sheet of parchment for easy cleanup. If the cocoa mixture is too watery the speckles run, but too thick and you only get blobs—aim for something just thinner than pancake batter.
Storage and Serving Suggestions for Spring Gatherings
These cookies keep their texture for days and the color only deepens slightly over time. Tuck wax paper between layers in your storage tin to prevent smudging your artwork.
- Avoid stacking them until icing is fully dry.
- Bring to room temperature before serving for the best flavor.
- Slipping one into a lunchbox is a surefire way to brighten someone’s day.
 Save to Pinterest
 I hope these robins egg cookies add sparkle (and maybe a little cocoa-dusted mischief) to your next celebration. Few things beat the sound of laughter drifting from a plate of blue speckled treats.
Recipe Questions & Answers
- → How do I achieve the blue color without thinning the dough?
Use gel food coloring, which delivers vibrant color with just a few drops and won’t alter the dough's consistency.
- → What method creates the chocolate speckles?
Mix cocoa powder with water and vanilla, then flick a stiff brush dipped in the mixture over iced cookies for a speckled look.
- → Can I omit the almond extract?
Yes, almond extract can be left out if desired. The cookies will still have a delicious vanilla flavor.
- → Do I need special cutters for the shape?
No, oval or egg-shaped cutters are ideal, but round cutters work well for a similar charming effect.
- → How should I store these cookies?
Keep cookies in an airtight container at room temperature for up to one week for best freshness and texture.
- → Is the icing safe for freezing?
While the cookies freeze well, icing may become sticky when thawed. If you plan to freeze, consider icing after thawing.